Cordyceps Cultivation in Jars and Bins: The Ultimate Guide
Posted by Troy Cosky, Founder FunGuy Grow Supply on 26th Apr 2023

Cordyceps, the fascinating genus of fungi with roots in traditional Chinese medicine, has caught the attention of health enthusiasts worldwide for its outstanding health benefits. These benefits, which include boosting immunity, fighting fatigue, and improving athletic performance, are now accessible to everyone, thanks to the advances in cultivation technology. The once rare and expensive cordyceps can now be grown easily at home using jars and bins.
Our goal is to share our knowledge and experience with you, guiding you through the cultivation process to help you achieve success in growing Cordyceps in jars and bins. With valuable tips and tricks to enhance your growing techniques, we're confident that you'll be able to cultivate healthy and robust Cordyceps mushrooms with ease. Let's get started and explore the world of cordyceps together!
Materials needed for the Jar Tech or Bin Tech
- Jars or Bins
- Cordyceps liquid culture or spawn
- Substrate (rice or oats)
- Pressure cooker or steamer
- Spray bottle
- Plastic bags or containers
- Latex Gloves
- Face mask
- 70% isopropyl
- Paper towels
Step by Step Guide to Growing Cordyceps in Jars and Bins
Step 1: Choosing Your Cordyceps Strain

Certain Cordyceps strains have become staples for growers worldwide. Their popularity speaks to their remarkable cultivation potential. Cordyceps militaris, Cordyceps sinensis, and Cordyceps cicadae are among the most well-known, each offering unique benefits for cultivation. By selecting one of these popular strains, you'll have the advantage of a wealth of resources and knowledge available to help you achieve successful growth in jars and bins.
Step 2: Preparing the Cordyceps Substrate
Cordyceps grow best on a substrate of grains, such as rice or millet. To prepare the substrate, rinse the grains and soak them in water for 12-24 hours. Drain the water and steam the grains until they are fully cooked. Allow the grains to cool to room temperature before adding the cordyceps spawn.
Step 3: Inoculating Your Substrate

Once your substrate is prepared, it's now time to carefully inoculate it with cordyceps spores. You can purchase cordyceps spores from a reputable supplier or harvest them from mature fruiting bodies. Before inoculating your substrate, ensure a pristine and sterile work area. Then, mix the spores with the substrate, making sure to distribute them evenly.
Step 4: Incubating Jars or Bins
After inoculating your substrate, it's time to incubate your jars or bins. For the best growth of Cordyceps, maintaining a warm and moist environment is essential for optimal results. Keep your jars or bins at a temperature of approximately 20-25°C and a humidity level of 70-80%, allowing the mycelium to inoculate the substrate and thrive. You can achieve this by using a humidifier or by placing your jars or bins in a warm, humid location such as a greenhouse or grow tent.

Step 5: Monitoring Growth
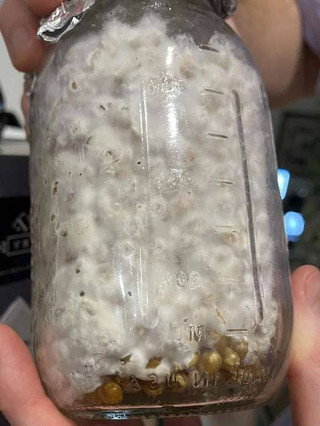
Cordyceps typically take around 2-3 weeks to colonize the substrate. It is imperative to closely monitor the growth of your cordyceps in jars or bins and ensure that the temperature and humidity levels are properly maintained. You might also need to add additional moisture to the substrate to keep it adequately hydrated.
Step 6: Inducing Fruiting in Cordyceps
Once your substrate is fully colonized, it's time to induce fruiting. In order to stimulate fruiting, decrease the temperature within the range of 15-20°C while increasing humidity levels to 90-95%. This environment will mimic the natural conditions that Cordyceps thrive in and will trigger the formation of fruiting bodies. You can achieve this by misting your substrate regularly with water or by using a humidifier. After a few days, you should start to see mature fruiting bodies forming.
Step 7: Harvesting Your Cordyceps from Jars or Bins

After your fruiting bodies mature, harvest your cordyceps with care to protect these delicate and valuable specimens. To do this, gently twist the fruiting body at the base until it separates from the substrate. Be sure to harvest your cordyceps before the spores are released, as this can contaminate your growing environment.
Tips and Tricks for Successful Cordyceps Cultivation
- Maintaining proper temperature and humidity levels
- Ensuring a sterile work area
- Harvesting the cordyceps before spores are released
Cultivating cordyceps is an easy and rewarding process that can be done at home with jars and bins. By following these seven steps, you can successfully grow cordyceps in jars and bins and enjoy the numerous health benefits that this amazing fungus has to offer.
Looking for the best supplies to cultivate Cordyceps mushrooms at home? Visit FunGuy Grow Supply today for top-quality mushroom grow bags, kits, and spawn.
References:
- McCoy, P. (2016). Radical Mycology: A Treatise on Seeing and Working With Fungi. Chthaeus Press.
- Padilla-Brown, W. (2020). Cultivation of edible and medicinal mushrooms in urban agriculture: From the margin to the core. Journal of Agriculture, Food Systems, and Community Development, 9(1), 9-14. doi:10.5304/jafscd.2020.091.013

