All In One Spawn Bag, Bird Seed & Coco Coir Mushroom Grow Kit
- SKU:
- CGB100
- UPC:
- 777777
- Product Badge:
- Best Seller
| Skill level | Beginner/Advanced |
| Grow location | Indoors |
| Grow speed/Time to Fruit | 2 to 3 weeks |
| Kit dimensions | 6in H x 9in W x 6in D |
| Kit weight | 5 lbs |
| Fruiting temps | 60‑70°F |
All In One Spawn Bag, Bird Seed & Coco Coir Mushroom Grow Kit
Mushroom Grow Kit Overview
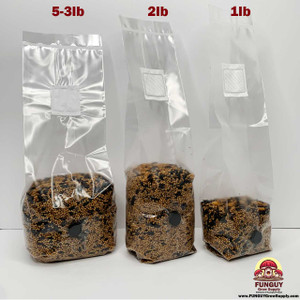
The All In One Spawn Bag, Bird Seed & Coco Coir Mushroom Grow Kit is carefully designed to simplify the mushroom growing process. The grow kit includes a specially formulated organic blend of sterile wild bird seed (WBS), coco coir substrate, and horticulture vermiculite, which provides a nitrogen-rich and optimal environment for mushroom growth. With the combination of these nutrient-rich ingredients, you can expect successful colonization and abundant fruiting.
All In One Mushroom Grow Bag Instructions
Step 1: Preparation and Inoculation
- Start by unpacking the mushroom kit and removing the protective wrap.
- Gently unfold the top flap to allow fresh air to flow through the 0.5 micron filter patch.
- Sterilize the kit and injection site with isopropyl alcohol to minimize the risk of contamination.
- Prepare your spore syringe or liquid culture solution for inoculating the bag with your favorite spores or mushroom strain.
- Through the self-healing injection port, simply inject around 2-4 ccs of mushroom spore or liquid culture solution into the kit. Avoid over-saturation.
- Do not mix the kit after inoculation. Instead, rotate it gently to distribute the solution evenly through the sterilized grain and birdseed portion.
- Place the kit to incubate in a warm, dark location with an incubation temperature of approximately 65-75 degrees Fahrenheit.
Step 2: Colonization and Mixing
- After 3-5 days, you will notice the wild bird seed (WBS) at the bottom of the kit overgrowing with white mycelium, indicating colonization.
- Allow the healthy mycelium growth to fully colonize the entire bird seed/grain portion before proceeding.
- Once colonization is complete, mix the grain/birdseed and compost in the kit to disperse the colonized (WBS) grain spawn throughout the substrate.
- Patience is key during this stage. Wait for the entire kit, including the grain/seed and coco coir, to fully colonize.
- It is recommended to fruit the kit when the mushroom substrate reaches 80% or higher colonization. However, waiting for 100% colonization is ideal.
Step 3: Mushroom Fruiting Stage
- The All In One Mushroom Grow Bag kit offers various options for fruiting. You can choose to fruit the kit inside the bag, in a terrarium, plastic tote, fruiting chamber, or monotub.
- If you decide to fruit in the bag, cut the bag open to provide fresh air once the substrate block is fully colonized.
- Mist the substrate with clean or distilled water if it appears to be drying out, and then fold the bag shut to retain moisture. Use clean tape or a paper clip to secure the fold.
- Lower the temperature to around 70-75 degrees Fahrenheit to induce fruiting.
- Open the fruiting bag once a day or every other day to ensure proper gas exchange and fresh air exchange (FAE) for optimal fruiting conditions.
- The three essential factors for successful fruiting are temperature, oxygen level, and humidity. Maintaining these at the right levels will encourage the substrate to fruit.
- On average, it takes about 2 weeks (10-16 days) for the kit to start fruiting.
- As the mushrooms develop, open the bag to create more room for their growth.
- Once the mushrooms are fully grown, harvest the fungi carefully and fold the top of the bag closed to prevent substrate drying. If needed, mist the substrate to rehydrate it for multiple flushes.
- Expect additional fruits to continue growing in the coming weeks, ensuring a bountiful harvest of fresh mushrooms.
Product Summary
- The All In One Spawn Bag, Bird Seed & Coco Coir Mushroom Grow Kit provides a convenient and efficient way to grow mushrooms at home.
- The mushroom growing kit includes a carefully formulated blend of organic sterilized wild bird seed (WBS) and coco coir substrate for optimal mushroom growth.
- Follow the step-by-step instructions for successful cultivation, including preparation, inoculation, colonization, and fruiting.
- Keep the bag indoors in a closet, pantry, grow tent, or greenhouse, or outdoors in a shaded and protected area. Our easy step-by-step instructions make it easy for anyone to grow fresh mushrooms at home like a pro.
- The kit offers flexibility in fruiting options, such as in-bag fruiting, terrariums, plastic totes, grow tents or monotubs.
- Proper control of temperature, oxygen level, and humidity is crucial for successful fruiting.
- Harvest the fully grown mushrooms, and expect continuous fruiting in the following weeks.
With the All In One Spawn Bag, Bird Seed & Coco Coir Mushroom Grow Kit, you can embark on a rewarding and delicious journey of growing your own mushrooms. Enjoy the freshness and flavors that only homegrown mushrooms can provide.
Frequently Asked Questions
How to use a mushroom grow bag?
To utilize a mushroom grow bag successfully, follow these steps:
Sterilize the bag: Place the bag in a pressure cooker or steam sterilizer for 90 minutes. Let it cool.
Inoculate the bag: Inject mushroom spores or mycelium into the substrate through a small hole using a sterile syringe. Distribute them evenly.
Seal and store: Close any holes in the bag and keep it in a dark, warm place (70-75°F or 21-24°C). The mycelium will start spreading.
Wait for colonization: It takes 2-4 weeks for full colonization, depending on temperature and strain.
Initiate fruiting: Cut slits in the top of the bag and mist lightly daily to maintain humidity. Increase humidity as tiny pinheads appear.
Provide light and humidity: Give indirect light for 12 hours daily, mist more frequently, and maintain proper humidity levels.
Harvest the mushrooms: When mature, twist and pull the mushrooms gently from their base.
By following these steps, you can successfully cultivate delicious mushrooms at home using a grow bag.
How long does it take mushrooms to fruit?
The fruiting time of mushrooms varies depending on factors like strain, grow kit or spawn bag, and cultivation conditions. Generally, after 1-2 weeks of substrate colonization, mycelium forms pinheads, signaling the start of mushroom growth. It typically takes 5-10 days for pinheads to develop into harvest-ready mushrooms. Different strains have different growth rates. All in one spawn bags and grow kits optimize fruiting time with ideal conditions. To maximize yield, maintain optimal temperature, humidity, and light exposure, and mist regularly. While the timeframe varies, mushrooms usually go from pinheads to harvestable within 5-10 days after primordia formation.
How to grow mushrooms in grow bags?
To grow mushrooms in grow bags, follow these steps for successful cultivation:
Prepare the mushroom grow kit by combining wild bird seed (WBS) and coco coir in the provided bag. Inject the sterilized substrate with mushroom spores using a sterile needle or syringe, ensuring even distribution. Seal the bag securely to create a controlled environment. Wait patiently as mycelium colonizes the substrate, maintaining ideal temperature and humidity levels. Look out for the formation of pinheads, indicating mushroom growth. Continue providing optimal conditions until the pinheads develop into mature fruiting bodies. Enjoy a bountiful harvest of delicious mushrooms using your all in one spawn bag, bird seed & coco coir mushroom grow kit. Note: Maintain darkness, a temperature of 70-75°F (21-24°C), and patience throughout the process.
How to grow mushrooms in an all in one bag?
To grow mushrooms in an all in one bag:
- Prepare the spawn bag: Sterilize the bird seed inside the bag to eliminate contaminants that could hinder mushroom growth.
- Add the spores: Inject mushroom spores into the sterilized bag through the injection port.
- Incubation period: Seal the bag and place it in a warm environment (70-75°F or 21-24°C).
- Introduce humidity: Once colonization is complete, create small holes in the bag and mist it with water to provide the necessary humidity for fruiting.
- Fruiting stage: Keep the all in one bag in a cool area (60-65°F or 15-18°C) with indirect light exposure. Within 7-10 days, pinheads will emerge on the substrate mixture. These will mature into fully-grown mushrooms ready for harvest.
By following these steps and providing proper care throughout each stage, your all in one mushroom grow kit will produce beautiful, edible mushrooms in approximately 4-6 weeks.
How long for mycelium to colonize substrate?
The colonization time of mycelium in substrate varies based on temperature, moisture levels, and mushroom species. Generally, it takes 10-14 days for full colonization. Factors like temperature and moisture affect the growth time. The ideal temperature range is 70°F-75°F (21°C-24°C). Inadequate temperature can slow down colonization. Moisture levels should be balanced to prevent excessive wetness or dryness.
Different mushroom species have varying colonization times; oyster mushrooms may take a week, while shiitake mushrooms can take up to three weeks. After full colonization, fruiting occurs within one to four weeks, depending on environmental conditions and mushroom species. Understanding these factors allows for optimal cultivation and successful mushroom growth. Monitor temperature, moisture levels, and follow best practices for a fruitful harvest!
What do oyster mushrooms grow on?
Oyster mushrooms can thrive on a variety of organic materials like straw, sawdust, coffee grounds, or wood chips. These substrates provide necessary nutrients for their growth. Straw is a popular choice due to its availability and suitability as a base. Sawdust, on the other hand, has high nutrient content and requires mixing with other ingredients for enhanced nutrition. Coffee grounds, rich in nitrogen, can be combined with materials like cardboard or newspaper. Lastly, hardwood chips are preferred over softwood chips for better mycelium growth. By understanding these substrate options and following proper cultivation techniques, you can successfully grow your own delicious oyster mushrooms at home!
How to tell when mycelium is fully colonized?
To confirm complete mycelium colonization, observe the following signs:
White Fluffiness: A white, fluffy layer indicates mycelium's total coverage of the substrate, implying nutrient consumption and growth.
Consolidation: Fully colonized substrate becomes compact and firm, losing its loose or crumbly texture.
Contamination Absence: Lack of mold, bacteria, or unwanted organisms suggests mycelium's successful colonization and protective barrier formation.
Time Frame: Colonization duration varies based on temperature and moisture. Grain spawn typically takes 10 days to 3 weeks, while bird seed and coco coir kits may require 2-4 weeks.
Patience is vital to ensure optimal results. Rushing may cause incomplete colonization and reduced yields. Once confirmed, proceed with fruiting conditions to observe mushroom growth.
How long does inoculation take?
After inoculation it usually takes 2-4 weeks for complete mycelium colonization of the substrate. Factors like temperature, humidity, and organic material type affect the duration. Maintaining a sterile environment is crucial during this time to prevent contamination and ensure successful growth. Here's a breakdown of the stages:
- Sterile Techniques: Set up a clean and sterile work area by disinfecting surfaces, wearing gloves and a mask, and using sterilized equipment.
- Self Healing Injection Port: The all in one spawn bag comes with a self-healing injection port for easy and sterile inoculation. Inject mushroom spores directly into the substrate using a spore syringe.
- Post Inoculation: After inoculation, tightly seal the spawn bag and place it in a warm location with temperatures between 70-75°F (21-24°C) for optimal growth.
- Grow Times: As colonization occurs, white mycelium spreads throughout the substrate within the bag. This process typically takes 2-4 weeks.
How to make a mushroom grow bag?
To make your own mushroom grow bags, gather rye grain, coco coir (or another substrate material), spawn, and high-quality plastic bags with filter patches.
First, rinse and soak the rye grain overnight. Drain and load the grains into the bags, leaving room for expansion.
Next, sterilize the filled bags to eliminate contaminants. Once cooled, inoculate each bag with spawn, agar, spore syringe, or liquid culture.
Put the inoculated bags in a warm, dark environment with consistent temperature and humidity for colonization.
Move fully colonized bags to a fruiting chamber with indirect light and fresh air circulation. Maintain appropriate fruiting conditions.
When primordia appear, seal the bag to create a humid environment that encourages mushroom formation. Harvesting will take several weeks.
Please note that timings may vary depending on factors such as genetics and cultivation techniques.
How long does it take mushroom spores to colonize?
The colonization time of mushroom spores can vary based on factors like mushroom type, environmental conditions, and the quality of your spawn bag or grow kit. Generally, visible signs of colonization can be seen within 7-14 days after spore injection. Complete colonization can take 2-4 weeks for bird seed-based substrates.
Ideal conditions for growth, such as a temperature range of 70-80°F (21-27°C) and 90% humidity, promote faster colonization. Different strains have different colonization rates, and using high-quality spawn bags or grow kits can speed up the process. Monitoring the progress is crucial, and once the substrate is fully covered in white mycelium, it's time to move on to fruiting. Patience, optimal conditions, and proper techniques ensure successful cultivation within the expected timelines.
How to get mushrooms to fruit?
To successfully fruit your mushrooms, follow these steps:
Timing: After mycelium colonization (2-4 weeks), trigger fruiting by introducing light for 12 hours a day.
Temperature and Humidity: Maintain temperatures of 65-75°F and humidity levels between 80-90%.
Fruiting Chamber: Set up an enclosed chamber with proper ventilation and airflow control using a plastic container or grow tent.
Patience: Wait for 1-2 weeks for pinheads (tiny mushroom heads) to appear on the substrate surface.
Growth and Harvest: Over the next week or two, watch the pinheads grow into mature mushrooms ready for harvest.
Remember to consult specific instructions from your kit manufacturer or reputable sources for optimal results as different mushroom species may have varying requirements.
How long does it take a mushroom to grow?
The time it takes for mushrooms to fully develop varies based on the mushroom species and cultivation conditions. Generally, mushrooms will begin to form within 1-2 weeks after the colonization process is complete.
During the fruiting stage, it's important to maintain optimal conditions, such as proper air circulation, humidity levels of 80-90%, and a temperature range of 65-75°F (18-24°C). The entire process, from spore injection to harvest, can take 4-8 weeks depending on factors like strain selection and environmental conditions. Monitor your grow kit closely and make necessary adjustments. Patience is key for a successful mushroom harvest.
